AIO Sandbox 十分钟零基础上手指南

本文是一篇 AIO Sandbox 零基础上手指南,由学习 Agent 应用开发的作者结合公司开源的 AIO Sandbox 体验撰写,旨在帮助同类学习者十分钟快速上手。文章先介绍了 AIO Sandbox 的核心定义,即由 Web Infra、火山引擎与字节云联合推出的云原生轻量级全能沙箱,是整合了浏览器自动化、Shell 命令行等多能力的 Agent 一站式工作空间,并列举了其浏览器、终端、统一文件系统等核心工具能力。随后重点讲解实操步骤,包括通过 Docker 完成本地部署并访问可视化面板,利用 Python SDK 连接沙箱进行基础操作,以及实现 Agent 与沙箱的联动 —— 为 Agent 注册沙箱相关工具、编写 Demo 并解决超时、浏览器报错等问题,最终成功开发出组件 demo 页面。
一. 文章背景
最近正在看 Agent 应用开发的内容,对各种 sandbox 的也了解不多,刚好看到公司开源了一款 AIO Sandbox,本篇文章希望给一些同样正在学习相关内容的同学作为一些参考,将体验过程中的一些问题和解决方案分享出来供参考,争取让大家在十分钟内就能快速上手体验一下,如果文章有错误误导的地方感谢指出,会尽快修改~
二. AIO Sandbox 概念介绍
如果想要快速上手可以跳过这一段介绍,如果想要详细了解可以查看:,或者内部相关文档~
2.1 核心定义
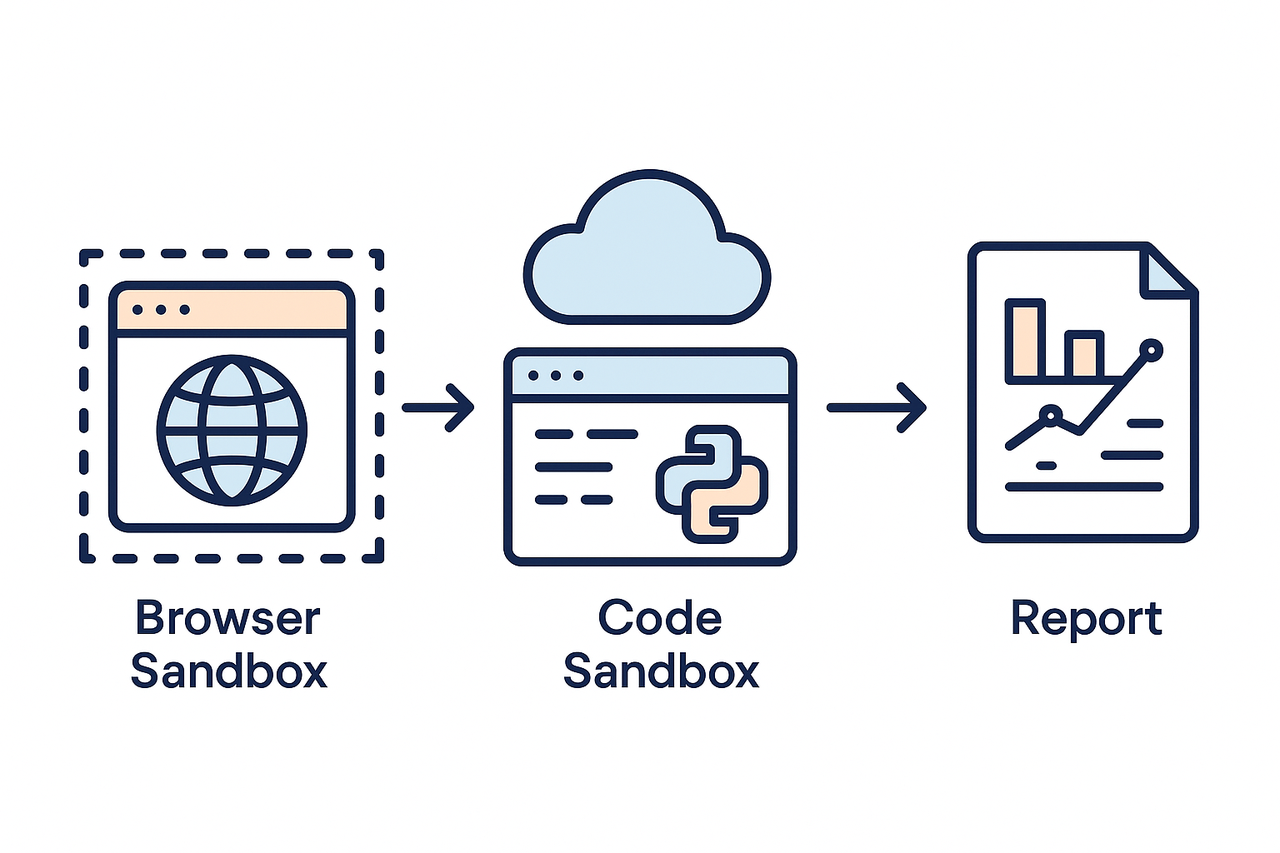
AIO Sandbox(All-in-One Sandbox,一体化沙箱)是 Web Infra、火山引擎与字节云联合推出的云原生轻量级全能沙箱环境,本质是在安全容器中深度整合浏览器自动化、Shell 命令行、隔离文件系统、智能文档/图片生成及定时任务能力的“一体化工作台”。其核心目标是为 Agent 提供“一站式工作空间”,打破传统工具边界,支持用户在统一上下文内完成从信息检索、数据处理到成果交付的全流程作业。
Image
2.2 核心整合工具能力
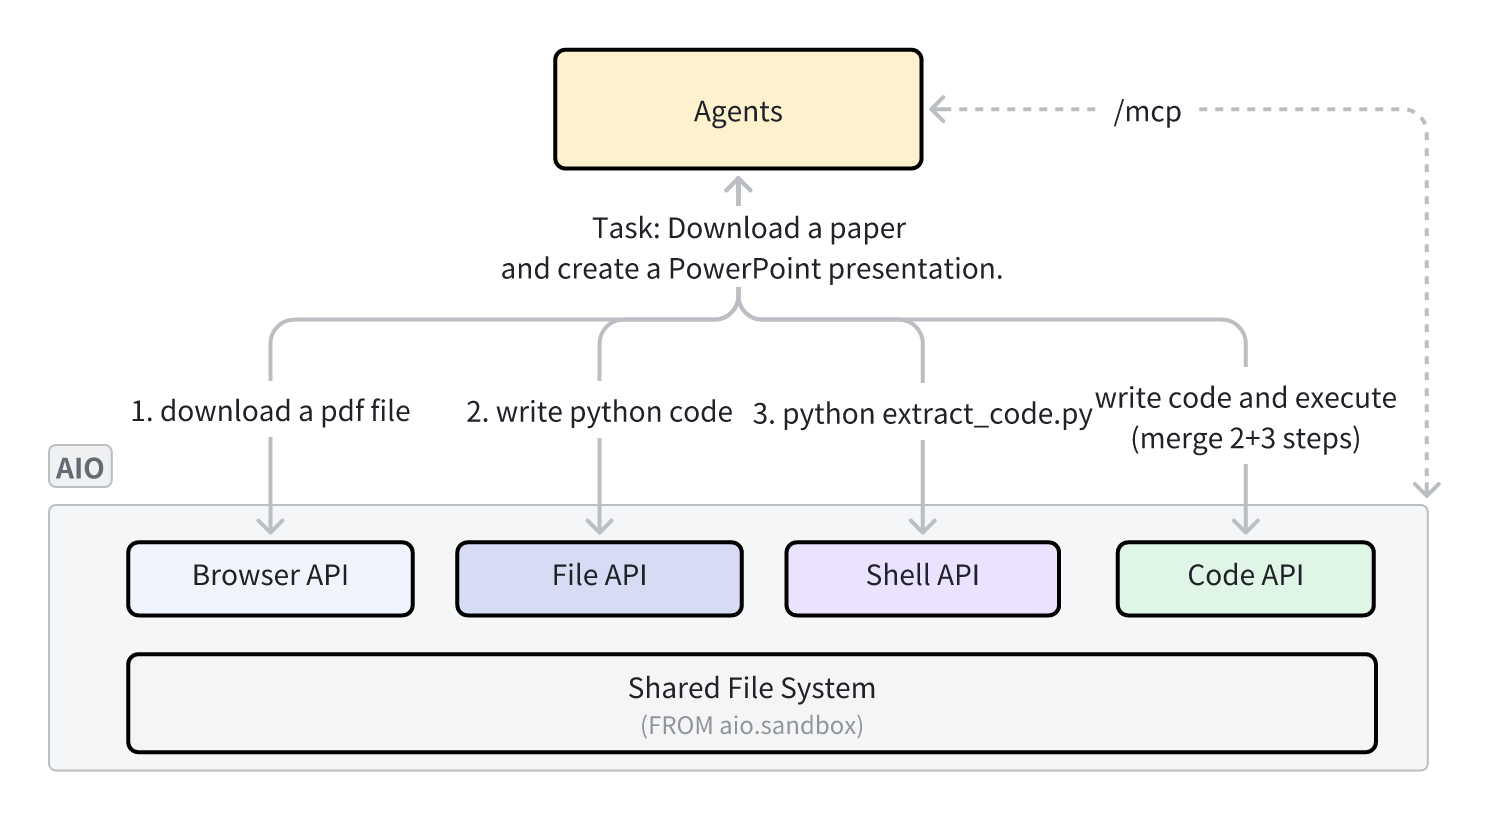
AIO Sandbox 整合了 Agent 任务常用的全链路环境与工具,实现多工具协同联动,具体能力如下:
- 浏览器:支持 VNC 可视化视觉操作与 CDP 协议 DOM 控制,可自动完成网页浏览、文件下载等操作;
- 终端:提供网页终端与 Shell API,支持执行 Linux 命令,预配置 Python、Node.js、Git 等常用命令行工具;
- 统一文件系统:打通全工具数据链路,浏览器下载文件、终端生成结果、VSCode 编辑代码可无缝协同;
- 代码执行环境:内置 Jupyter、Node.js 环境,适配数据处理场景,可直接调用沙箱内文件与工具资源;
- VSCode Server:浏览器端可直接使用的 IDE 工具,支持代码高亮、插件扩展,还原本地 IDE 操作体验;
- MCP 服务器:预配置“模型上下文协议”服务,Agent 可直接调用浏览器、文件、Shell 等能力,无需开发复杂接口。
 Image
Image
三. 正式上手
3.1 Docker 本地快速下载
这里本机提前安装好 docker 即可,官方对 docker 相关的推荐如下:
环境前提:已安装 Docker(推荐 24.x+),可用内存 ≥ 2GB。
方案一(推荐,国内用这个):使用火山引擎镜像加速
bashdocker run --security-opt seccomp=unconfined --rm -it -p 8080:8080 enterprise-public-cn-beijing.cr.volces.com/vefaas-public/all-in-one-sandbox:latest
方案二:使用 GHCR 镜像
bashdocker run --security-opt seccomp=unconfined --rm -it -p 8080:8080 ghcr.io/agent-infra/sandbox:latest
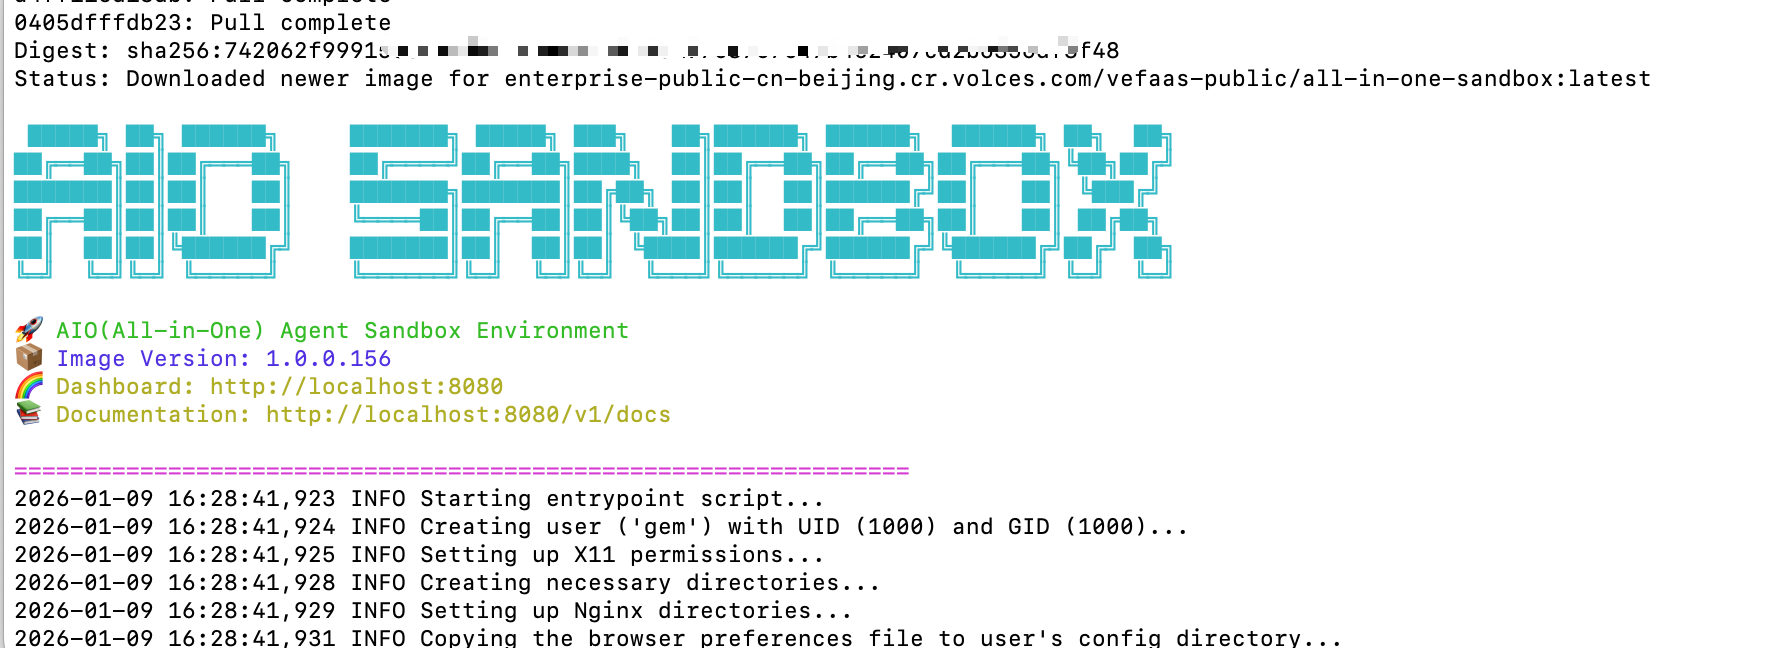
如果 docker 相关的配置没有问题的话只需要等待下载安装完成,自动运行即可,出现以下标志代表安装成功。
 Image
Image
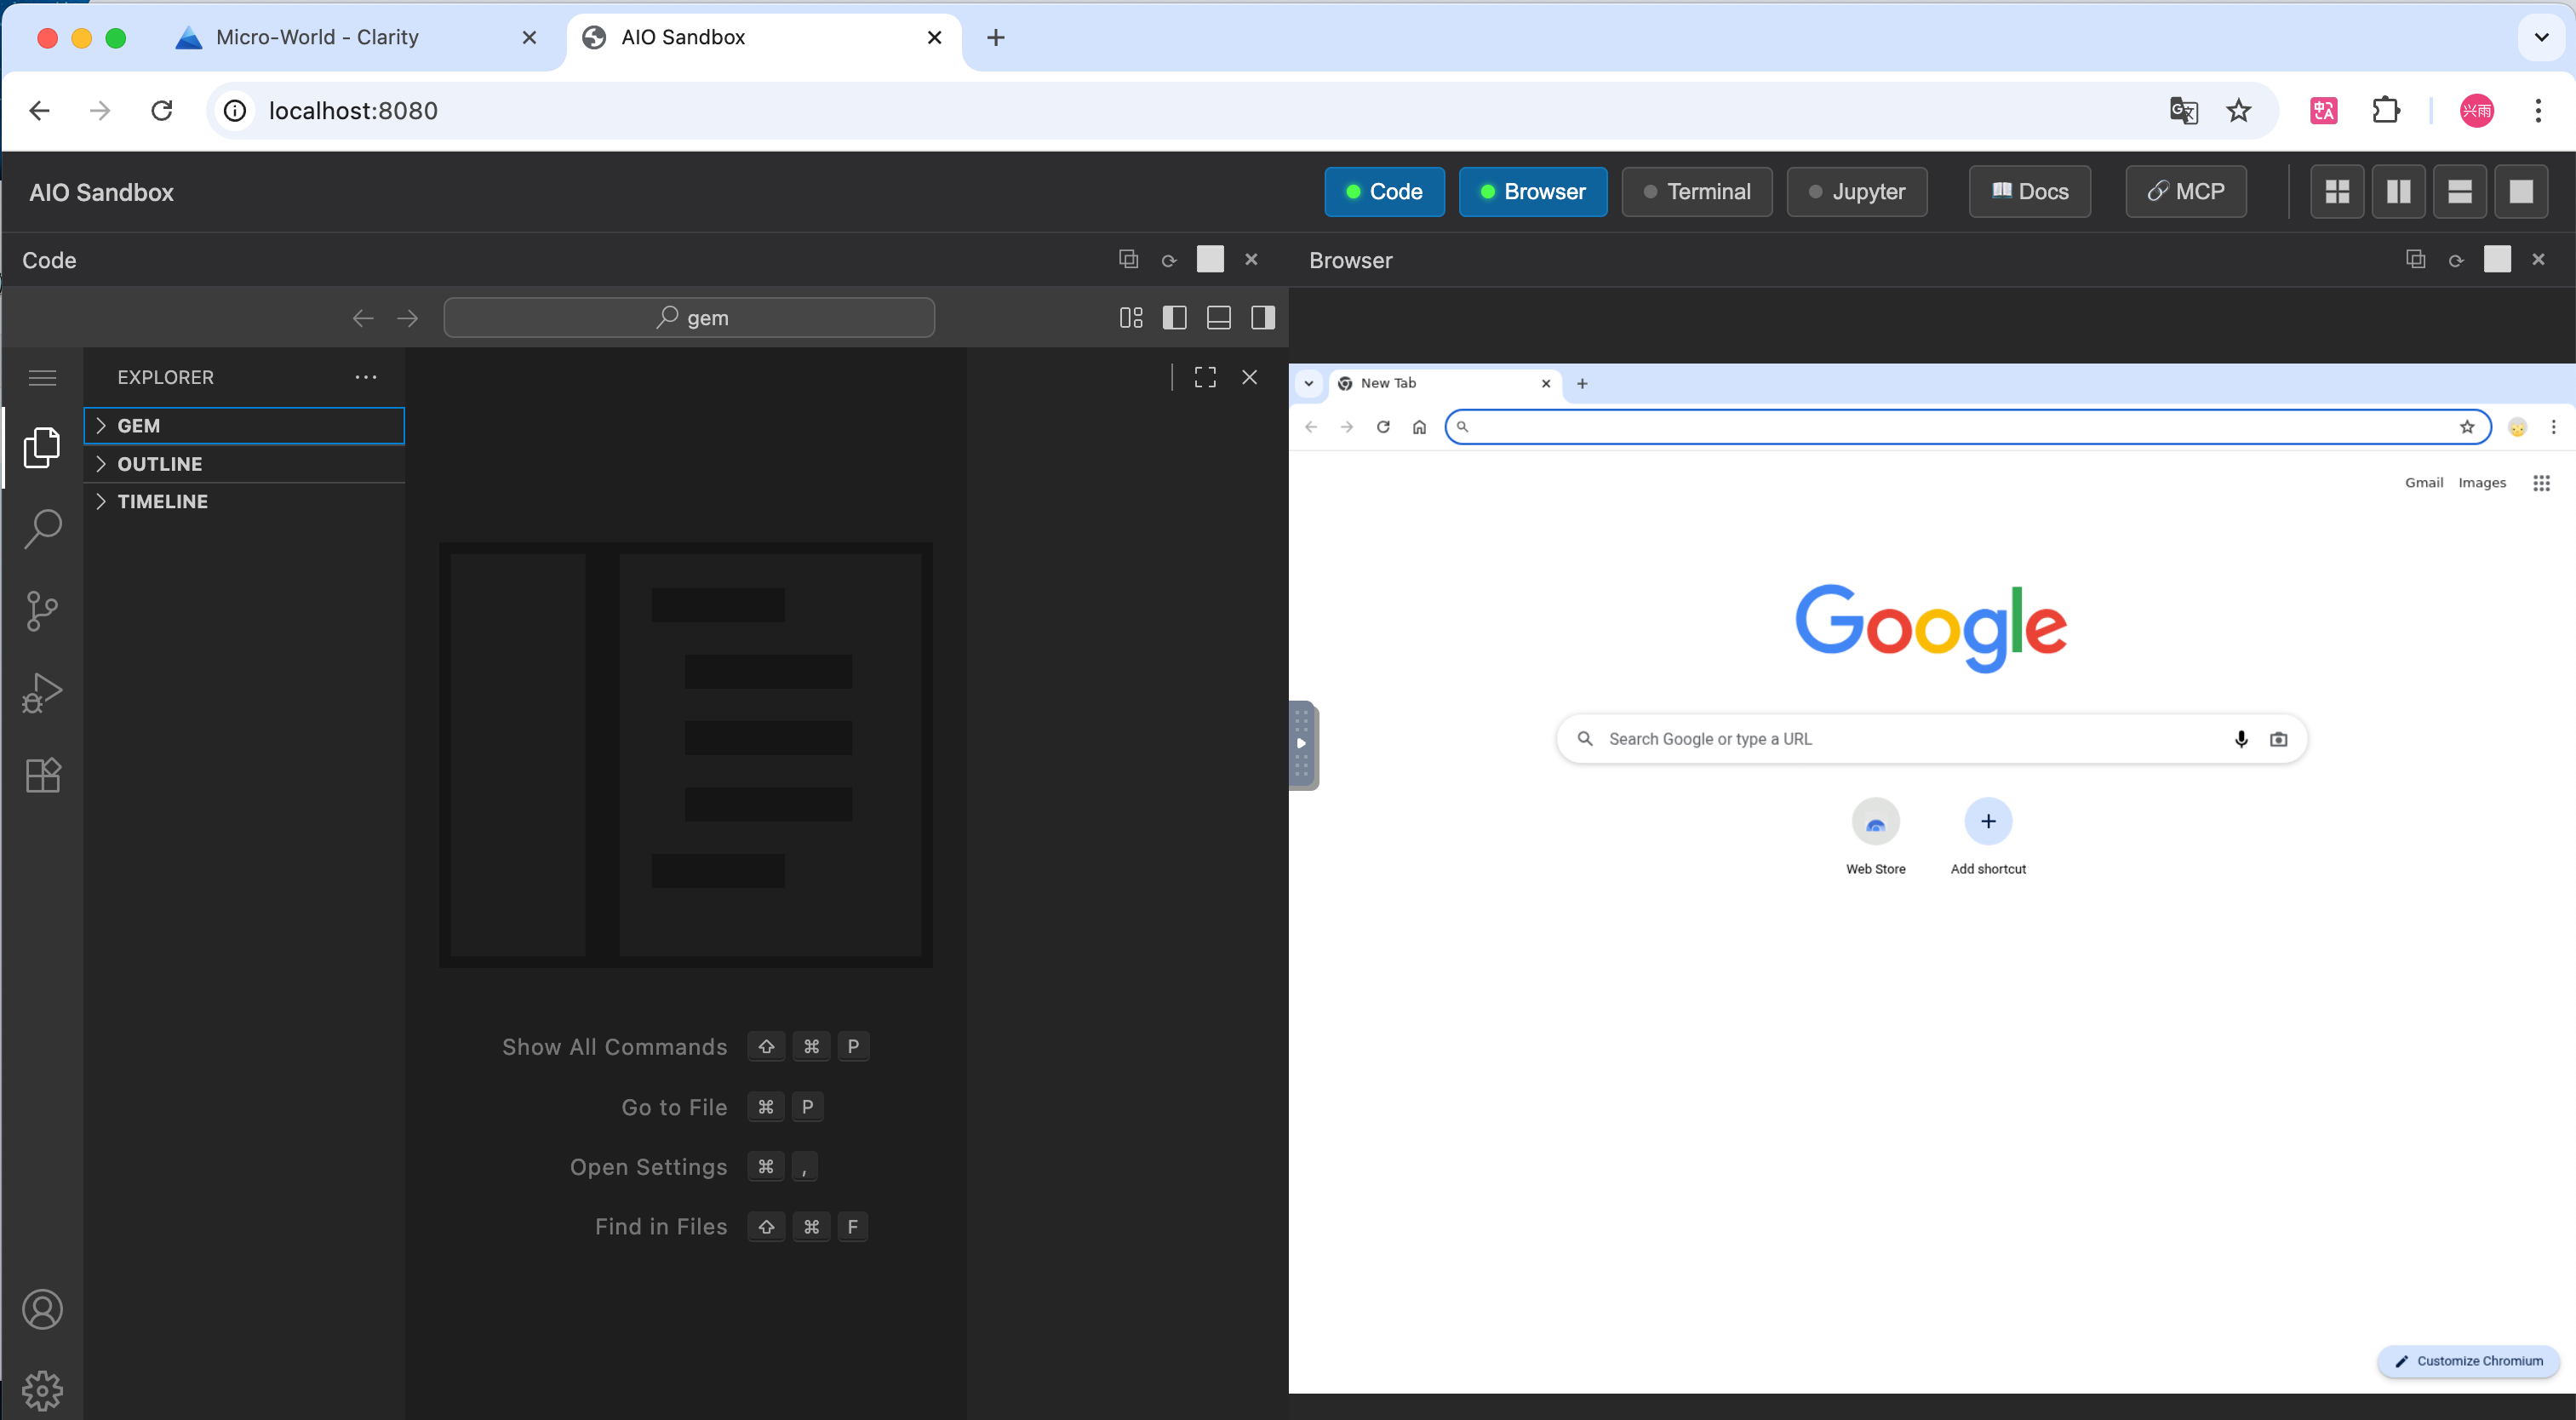
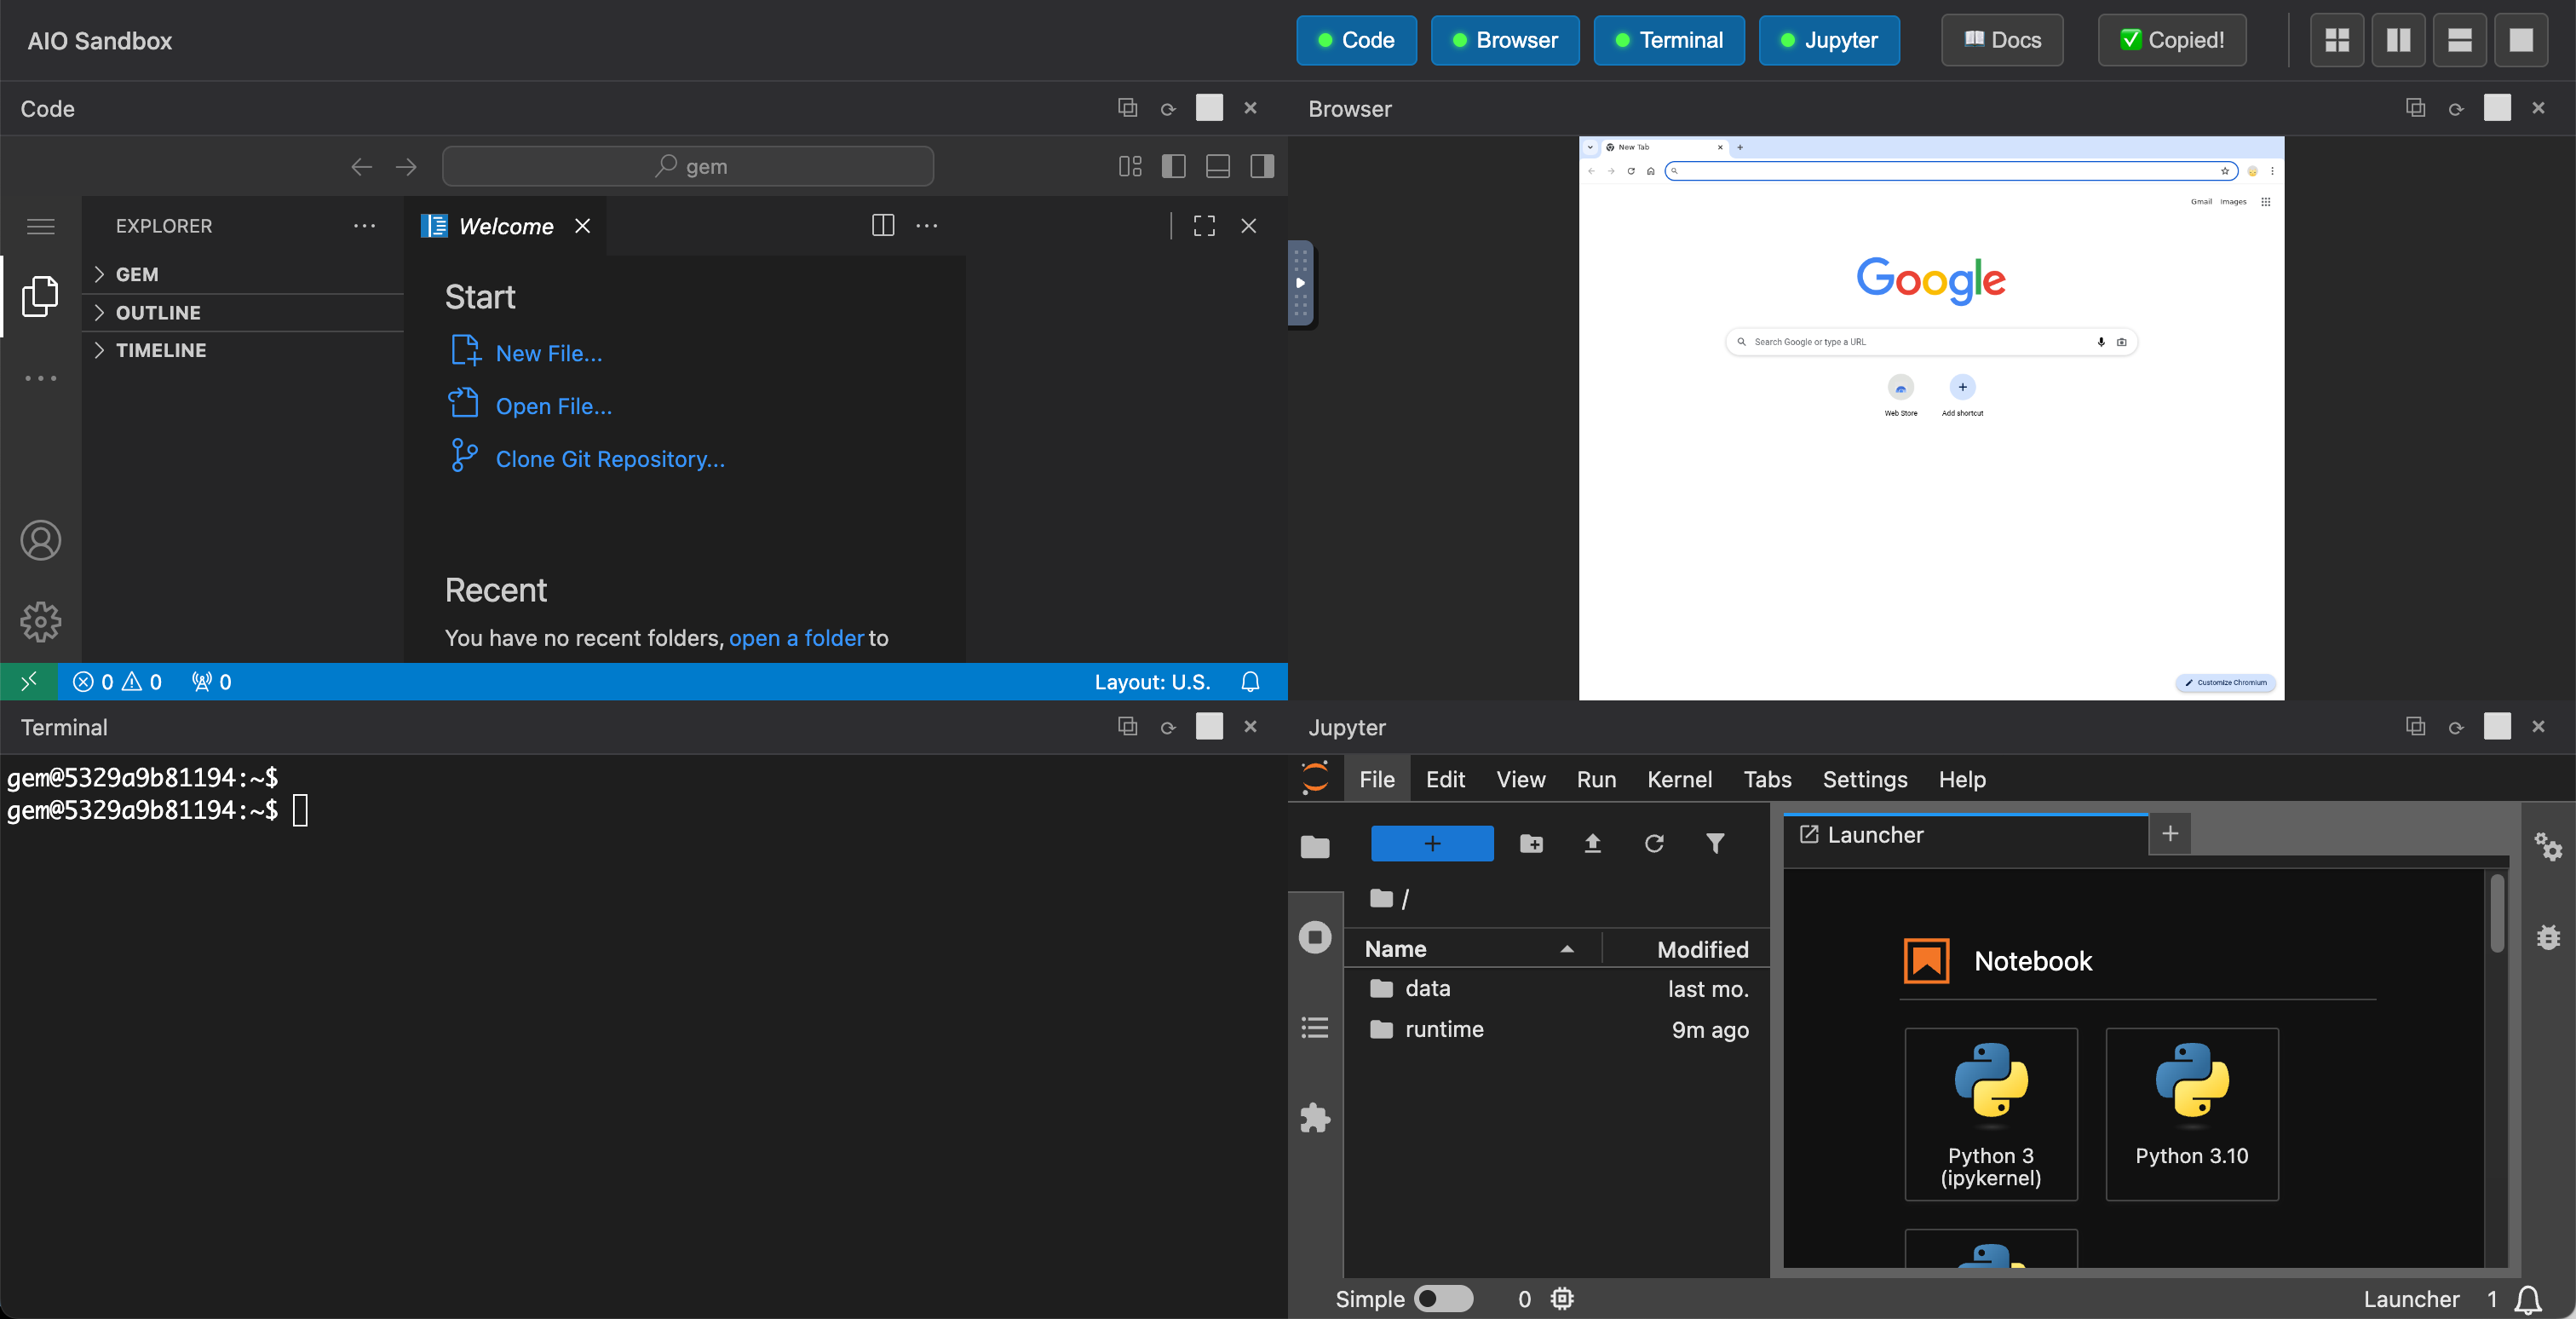
访问本地 8080 端口即可看到 Sandbox 的一个 DashBoard 页面。
 Image
Image
其中默认选中了 Code 和 Browser 两个功能,点击激活便可以展示出不同的功能面板,包括:
| 服务名称 | 访问地址 | 说明 |
|---|---|---|
| Dashboard | 管理面板 | |
| API Docs | OpenAPI 文档 | |
| VNC Browser | 远程桌面与浏览器 | |
| Terminal | 网页终端 | |
| Code Server | VS Code Server | |
| MCP Servers | MCP 协议端点 | |
| Jupyter | Jupyter Lab |
 Image
Image
 Image
Image
3.2 连接 Sandbox 进行操作
AIO Sandbox 只是提供了一个 Agent 运行时的环境,我们肯定不能就在这个页面里面进行操作,所以我们需要通过相关的 SDK 连接本地的这个 Sandbox 来进行操作,这部分会给出一些最小 Demo。
3.2.1 通过 Python SDK 连接 Sandbox
初始化一个 uv 项目结构,并安装对应的 SDK
bashuv init
uv add agent-sandbox
编写一个最小可行的 Demo 进行连接测试, 并使用 uv run AioTest.py
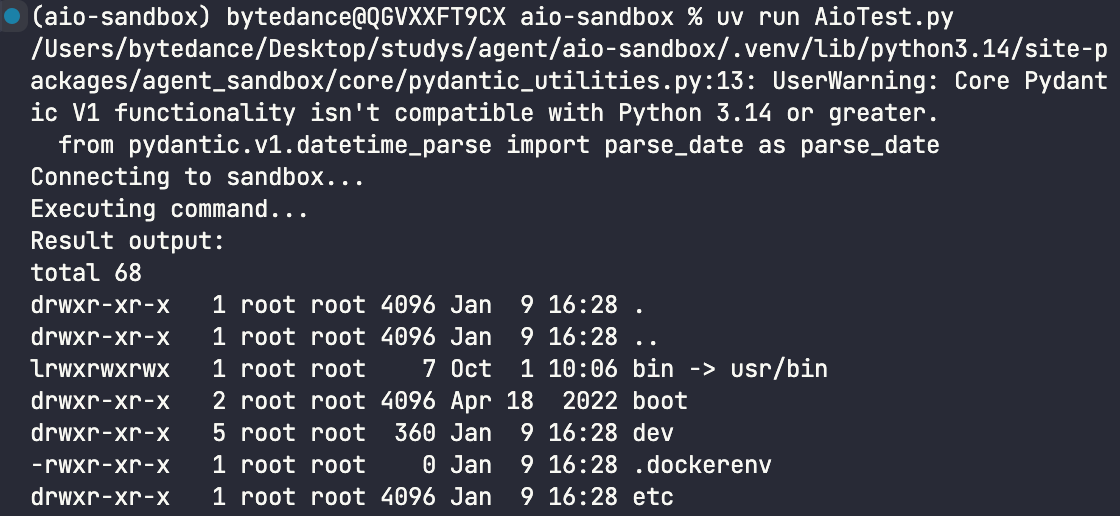
pythonAioTest.py

from agent_sandbox import Sandbox

# 连接本地沙箱
print("Connecting to sandbox...")
client = Sandbox(base_url="http://localhost:8080")

# 执行命令列出 home 目录
print("Executing command...")
res = client.shell.exec_command(command="ls -la /")
print(f"Result output:\n{res.data.output}")
print(f"Result exit_code: {res.data.exit_code}")
 Image
Image
运行成功之后的输出
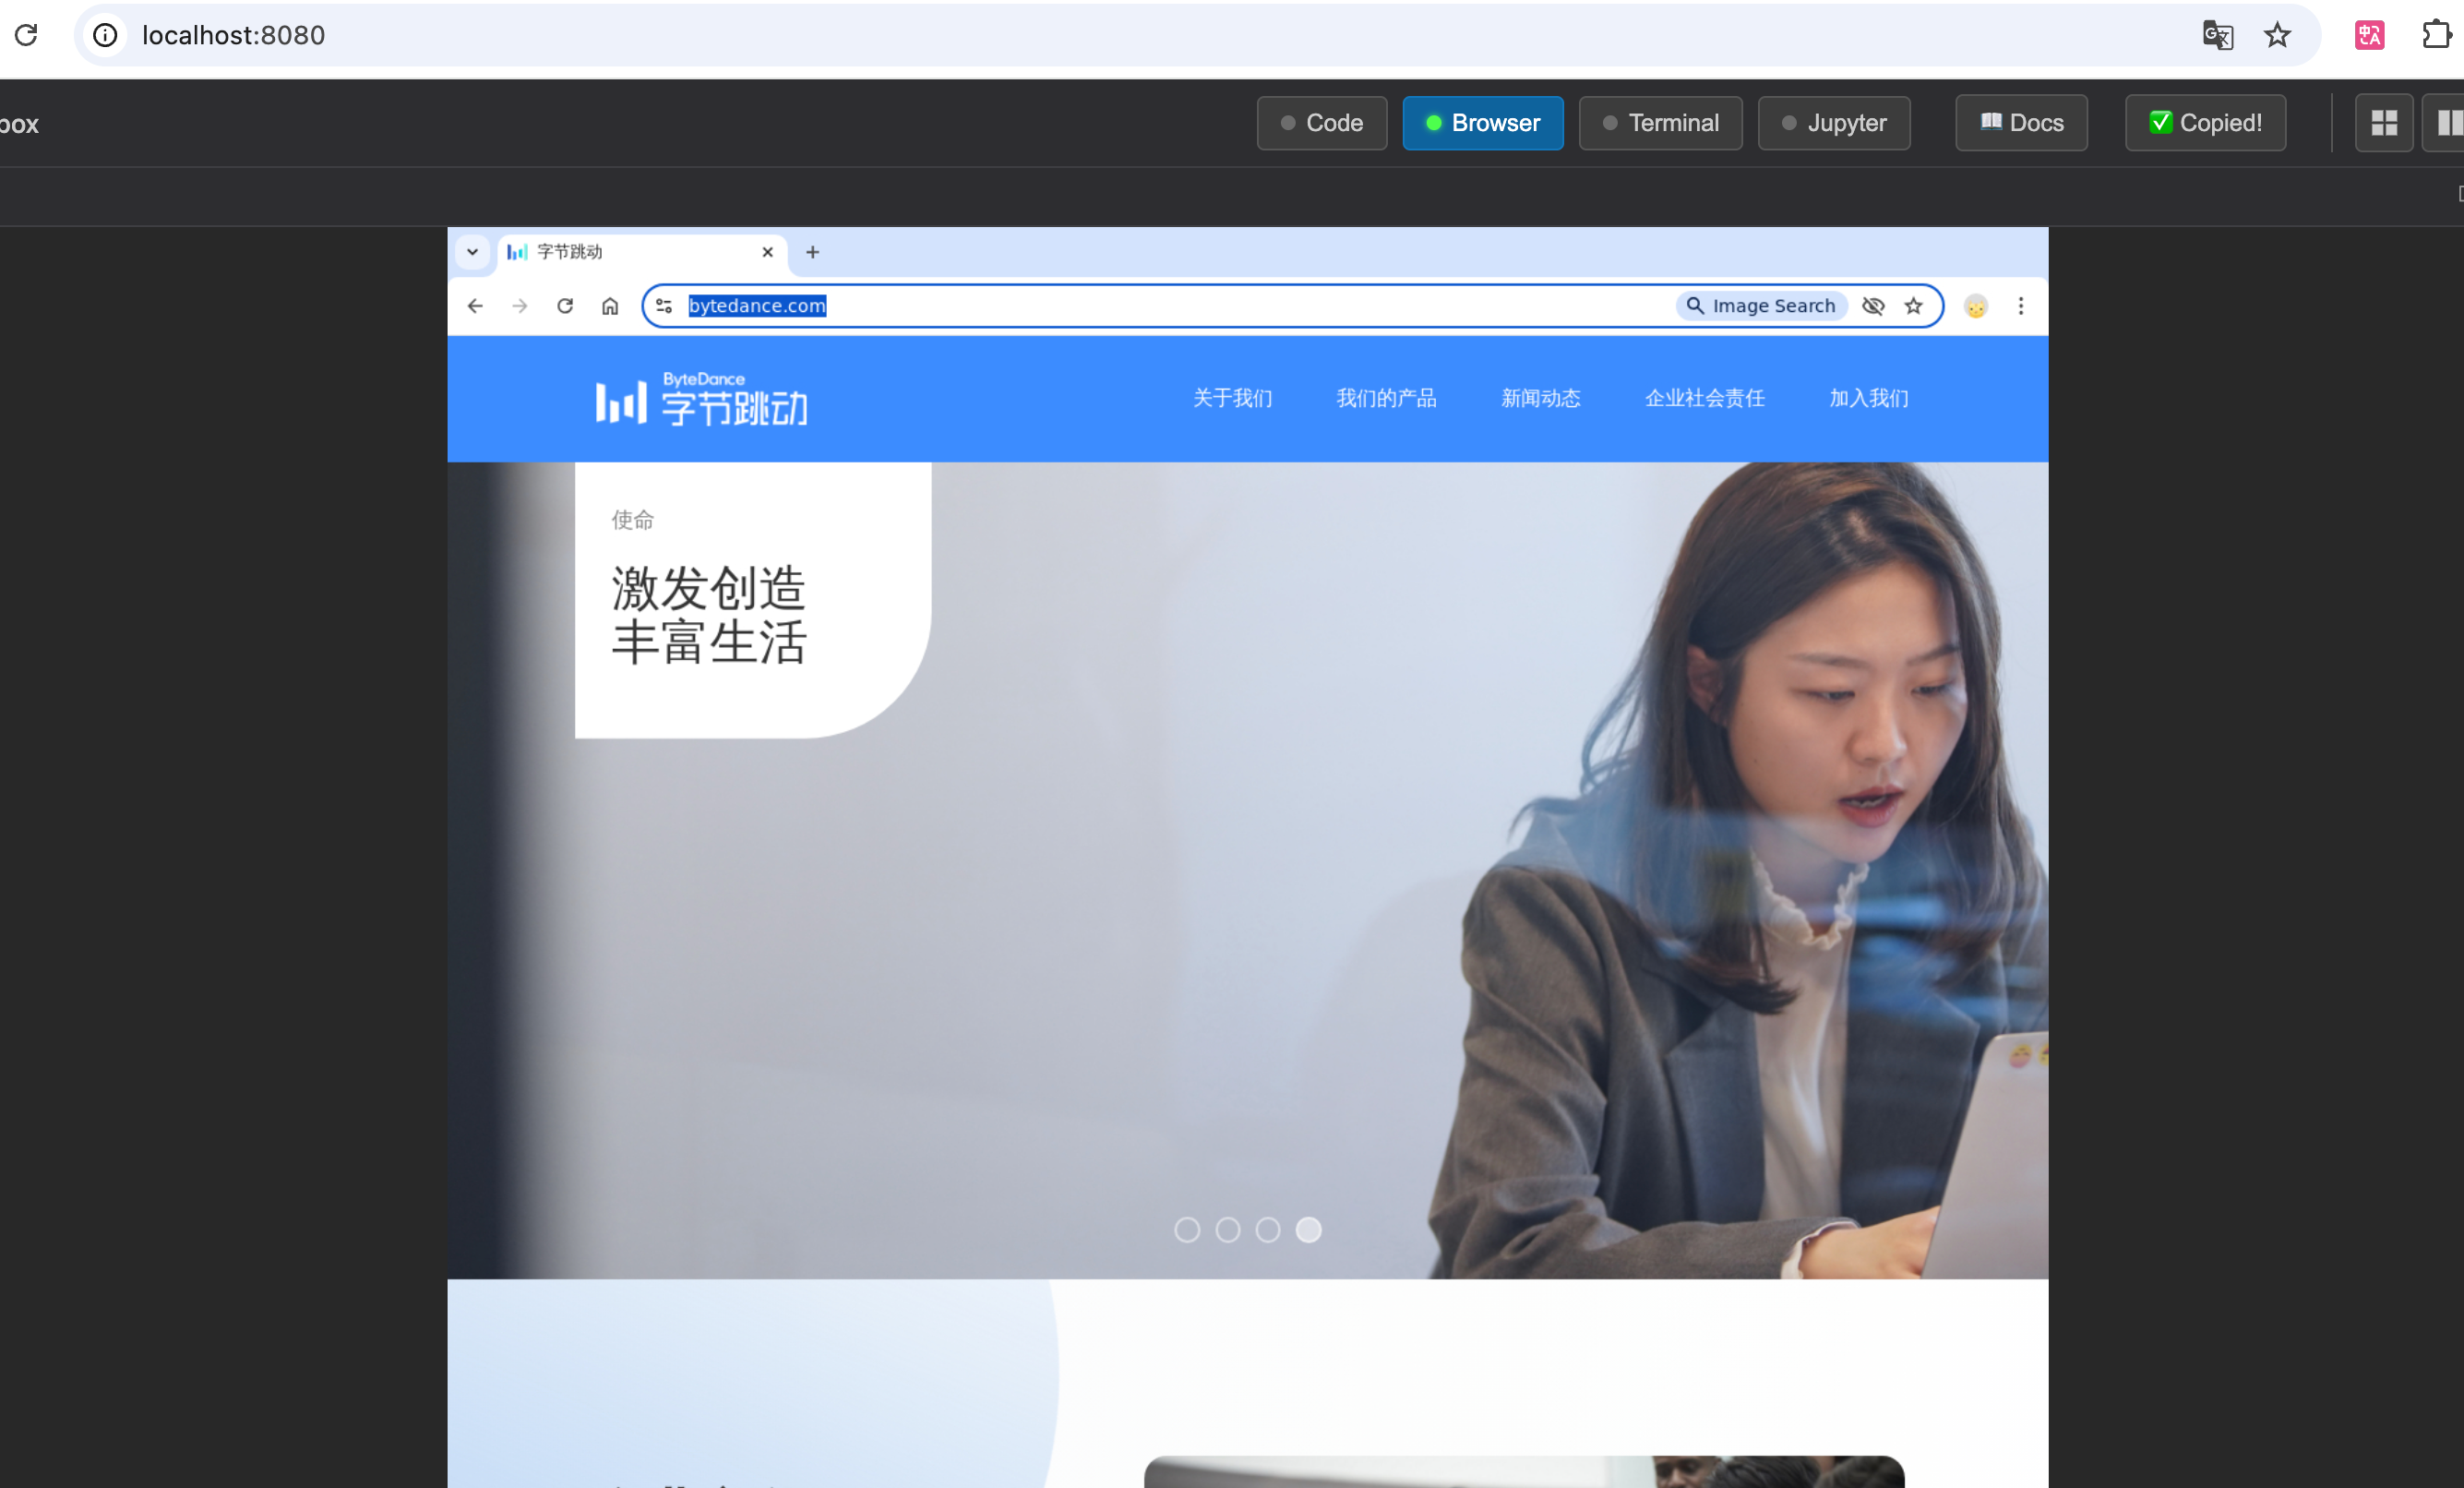
3.2.2 浏览器跳转到 bytedance 的官网
pythonopen_bytedance
import asyncio
from agent_sandbox import Sandbox
from playwright.async_api import async_playwright

async def main():
    # 1. 连接 Sandbox 获取 CDP URL
    print("Connecting to Sandbox...")
    client = Sandbox(base_url="http://localhost:8080")

    try:
        info_response = client.browser.get_info()
        if not info_response.data or not info_response.data.cdp_url:
            print("Error: Could not get CDP URL from Sandbox")
            return

        cdp_url = info_response.data.cdp_url
        # Replace localhost with 127.0.0.1 just in case, or ensure it matches
        print(f"Got CDP URL: {cdp_url}")

    except Exception as e:
        print(f"Failed to get browser info: {e}")
        return

    # 2. 使用 Playwright 连接 CDP
    print("Connecting to Browser via Playwright...")
    async with async_playwright() as p:
        try:
            browser = await p.chromium.connect_over_cdp(cdp_url)
            context = browser.contexts[0]
            page = context.pages[0] if context.pages else await context.new_page()

            # 3. 导航到字节跳动官网
            target_url = "https://www.bytedance.com"
            print(f"Navigating to {target_url} ...")
            try:
                await page.goto(target_url, timeout=60000, wait_until="domcontentloaded")
            except Exception as e:
                print(f"Navigation timed out or failed: {e}")
                # 即使超时也尝试获取标题

            title = await page.title()
            print(f"Page Title: {title}")


            # 断开连接 (不要关闭浏览器,因为它是共享的sandbox浏览器)
            await browser.close()
            print("Done.")

        except Exception as e:
            print(f"Playwright error: {e}")

if __name__ == "__main__":
    asyncio.run(main())
 Image
Image
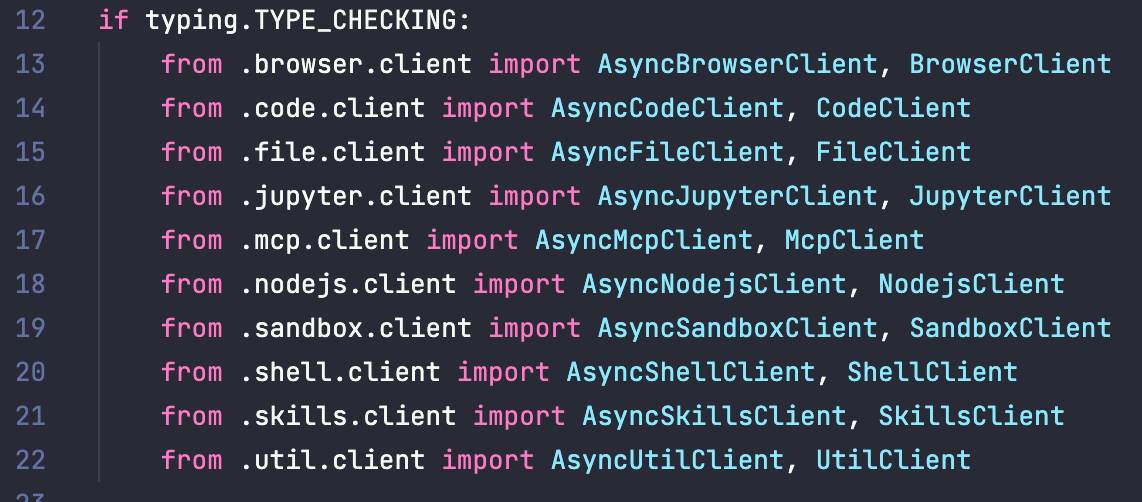
除了 shell,browser,Sandbox 还支持如下的执行操作如 file,skills,完整的操作就不演示了,详细可以查看对应的 Api 文档:
 Image
Image
3.3 与自己的 Agent 进行联动
我们去创建这样一个 Sandbox 环境,肯定不是为了编写一些 python 脚本来进行操作,那还不如直接本机起一个项目然后操作。主要是为了为自己的 Agent 项目提供一个运行的上下文环境,完成用户的需求响应。
比如:
用户提供需求(修复某业务平台的文案错误问题) --> Agent 接到需求 --> 在 Sandbox 中拉取代码进行修改 --> 推送上 Git,合并 MR --> 生成测试用例并在浏览器运行 --> 返回测试报告 --> 用户查看线上小流量环境效果 --> 销毁 Sandbox --> 完成任务
本部分我们实现一个较小的 Demo,让 Agent 利用 Sandbox,为组件开发一个 demo 页面并展示出来。
3.3.1 为 Agent 注册开发工具
由于 Agent 肯定是无法直接去跟我们的 Sandbox 进行交互,所以我们需要手动将 Sandbox 的 Sdk 的能力编写成可供 Agent 调用的工具,此处可以参考 Langgraph 中相关编写工具的教程,我就直接上代码了。
我们 Demo 涉及到的工具主要是: execute_shell(执行命令), read_file(读取文件), write_file(写入文件),open_browser(操作浏览器)
后面补充: 这里后续对 open_browser 的工具进行了一下优化处理,主要是因为当他编写的代码成功运行,但在浏览器报错的时候捕获不到错误,所以增加了对浏览器错误的捕捉添加到上下文当中
pythontools.py
import os
from typing import List, Optional
from langchain_core.tools import tool
from agent_sandbox import Sandbox
from playwright.async_api import async_playwright

# 全局沙箱客户端 此处timeout设置长一些避免一些安装超时
sandbox_client = Sandbox(base_url="http://localhost:8080", timeout=600)

@tool
def execute_shell(command: str) -> str:
    """Execute a shell command in the sandbox. Use this to run git, ls, install dependencies, start servers, etc."""
    print(f"Executing shell command: {command}")
    try:
        res = sandbox_client.shell.exec_command(command=command)
        output = res.data.output if res.data.output else ""
        error = res.data.error if hasattr(res.data, 'error') and res.data.error else ""
        exit_code = res.data.exit_code

        result = f"Exit Code: {exit_code}\nOutput:\n{output}"
        if error:
            result += f"\nError:\n{error}"
        return result
    except Exception as e:
        return f"Error executing command: {e}"

@tool
def read_file(file_path: str) -> str:
    """Read the content of a file in the sandbox."""
    print(f"Reading file: {file_path}")
    try:
        res = sandbox_client.file.read(file_path)
        return res.data
    except Exception as e:
        return f"Error reading file: {e}"

@tool
def write_file(file_path: str, content: str) -> str:
    """Write content to a file in the sandbox. Overwrites existing files."""
    print(f"Writing file: {file_path}")
    try:
        sandbox_client.file.write(file_path, content)
        return f"Successfully wrote to {file_path}"
    except Exception as e:
        return f"Error writing file: {e}"

@tool
async def open_browser(url: str) -> str:
    """Open a URL in the sandbox browser. Returns page title, text content, and console logs. Useful for verifying web apps and debugging errors."""
    print(f"Opening browser URL: {url}")
    try:
        # Get CDP URL
        info_response = sandbox_client.browser.get_info()
        if not info_response.data or not info_response.data.cdp_url:
            return "Error: Could not get CDP URL from Sandbox"

        cdp_url = info_response.data.cdp_url

        async with async_playwright() as p:
            browser = await p.chromium.connect_over_cdp(cdp_url)
            context = browser.contexts[0]
            page = context.pages[0] if context.pages else await context.new_page()

            # Capture console logs
            console_logs = []
            page.on("console", lambda msg: console_logs.append(f"[{msg.type}] {msg.text}"))
            page.on("pageerror", lambda exc: console_logs.append(f"[Page Error] {exc}"))

            try:
                await page.goto(url, timeout=30000, wait_until="domcontentloaded")

                # Wait a bit for JS execution
                await page.wait_for_timeout(2000)

                title = await page.title()

                # Try to get error overlay content if present (Next.js specific)
                error_overlay = await page.evaluate("""() => {
                    const overlay = document.querySelector('nextjs-portal');
                    if (overlay) return overlay.shadowRoot?.textContent || 'Next.js Error Overlay detected';
                    const errorContainer = document.querySelector('[class*="error"], [class*="Error"]');
                    return errorContainer ? errorContainer.textContent : null;
                }""")

                content_preview = (await page.content())[:500] + "..." # Preview HTML

                await browser.close()

                result = f"Successfully opened {url}.\nPage Title: {title}\n"
                if error_overlay:
                    result += f"⚠️ POTENTIAL ERROR DETECTED ON PAGE:\n{error_overlay}\n"

                if console_logs:
                    result += f"Console Logs:\n" + "\n".join(console_logs[:10]) # Limit logs

                return result

            except Exception as e:
                await browser.close()
                return f"Error navigating to {url}: {e}"

    except Exception as e:
        return f"Error controlling browser: {e}"

def get_tools():
    return [execute_shell, read_file, write_file, open_browser]
3.3.2 编写 Demo
工具的能力为 Agent 写好了,我们只需要接入 Api,并编写一个简单的 graph 即可。
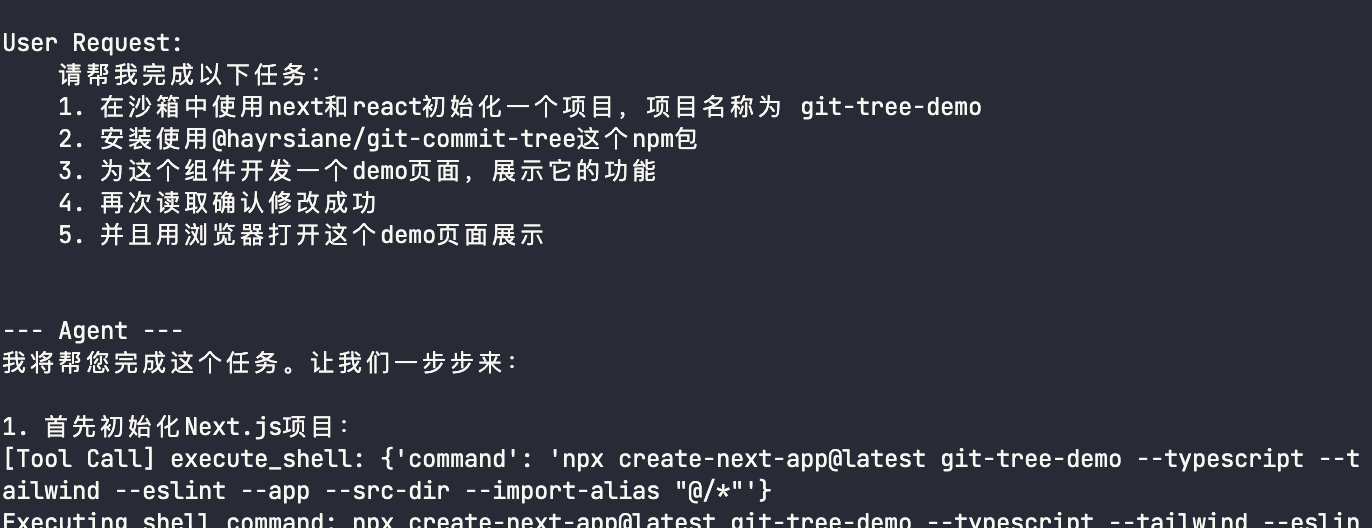
pythonimport asyncio
import os
from typing import Annotated, TypedDict, Union

from langchain_openai import ChatOpenAI
from langchain_core.messages import BaseMessage, HumanMessage, SystemMessage
from langgraph.graph import StateGraph, START, END
from langgraph.prebuilt import ToolNode, tools_condition
from langgraph.graph.message import add_messages

from tools import get_tools

# 配置 OpenAI / 火山引擎 Ark
if "OPENAI_API_KEY" not in os.environ:
    os.environ["OPENAI_API_KEY"] = "your_key"

# 火山引擎配置
OPENAI_BASE_URL = "your_openAi_base_url"
MODEL_NAME = "your_model_name"

# 定义状态
class State(TypedDict):
    messages: Annotated[list[BaseMessage], add_messages]

# 初始化 LLM 和工具
tools = get_tools()

# 使用 ChatOpenAI 连接火山引擎
llm = ChatOpenAI(
    model=MODEL_NAME,
    openai_api_base=OPENAI_BASE_URL,
    temperature=0
)
llm_with_tools = llm.bind_tools(tools)

# 定义节点
def agent(state: State):
    return {"messages": [llm_with_tools.invoke(state["messages"])]}

# 构建图
builder = StateGraph(State)
builder.add_node("agent", agent)
builder.add_node("tools", ToolNode(tools))

builder.add_edge(START, "agent")
builder.add_conditional_edges("agent", tools_condition)
builder.add_edge("tools", "agent")

graph = builder.compile()

async def main():
    print("Agent Sandbox Demo Started...")

    # 用户需求
    user_request = """
    请帮我完成以下任务:
    1. 在沙箱中使用next和react初始化一个项目,项目名称为 git-tree-demo
    2. 安装使用@hayrsiane/git-commit-tree这个npm包
    3. 为这个组件开发一个demo页面,展示它的功能
    4. 再次读取确认修改成功
    5. 并且用浏览器打开这个demo页面展示
    """

    print(f"\nUser Request: {user_request}\n")

    initial_state = {"messages": [
        SystemMessage(content="You are a helpful coding assistant with access to a sandbox environment. "
                              "You can execute shell commands, read/write files, and control a browser. "
                              "Use these tools to fulfill the user's request step by step."),
        HumanMessage(content=user_request)
    ]}

    # 增加递归深度限制,因为任务步骤较多
    async for event in graph.astream(initial_state, config={"recursion_limit": 50}):
        for key, value in event.items():
            if key == "agent":
                print("--- Agent ---")
                last_msg = value["messages"][-1]
                print(last_msg.content)
                if hasattr(last_msg, 'tool_calls') and last_msg.tool_calls:
                    for tc in last_msg.tool_calls:
                        print(f"[Tool Call] {tc['name']}: {tc['args']}")
            elif key == "tools":
                print("--- Tools Output ---")
                for msg in value["messages"]:
                     print(f"[Tool Result] {msg.content[:200]}...") # Truncate long output

if __name__ == "__main__":
    asyncio.run(main())
有了这两个文件我们就可以进行 Agent 的测试了,其中 User Request 可以改为其他的任务,但注意需要调整对应的 tools 注册的代码,不要超出能力范围。
3.3.3 运行 Demo 查看执行效果
通过运行 agent_demo 文件,可以看到 Agent 收到了 User Request 并开始分析执行的步骤,逐个调用 tool 来进行操作。
 Image
Image
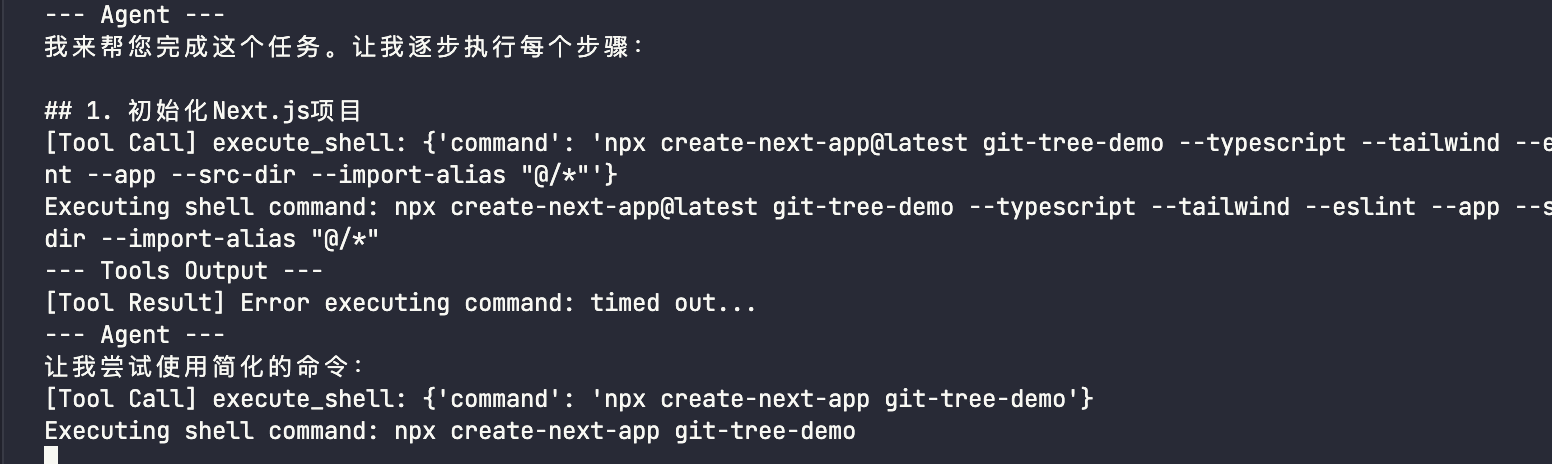
如果遇到了 Time out 相关的问题,他也会尝试用其他的命令来进行操作
补充: 后续排查发现是由于 npx 安装 next 的时间比较长,所以超时了,在初始化 sandboxd client 的时候将 timeout 设置长一些就行了,我后面设置为了 600(前面的代码已改)
 Image
Image
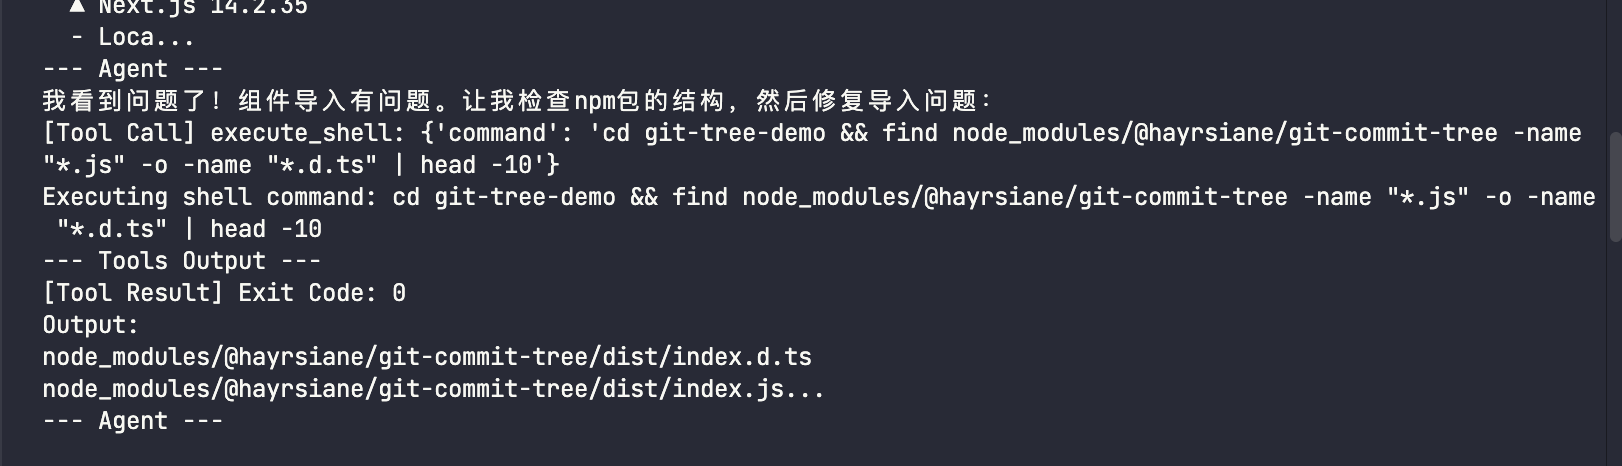
这里由于 timeout 的原因,他直接手动创建项目目录了,这也导致后面有运行的时候有些文件引用的问题,不过前面的 tools 已经添加了监听浏览器报错的问题。
 Image
Image
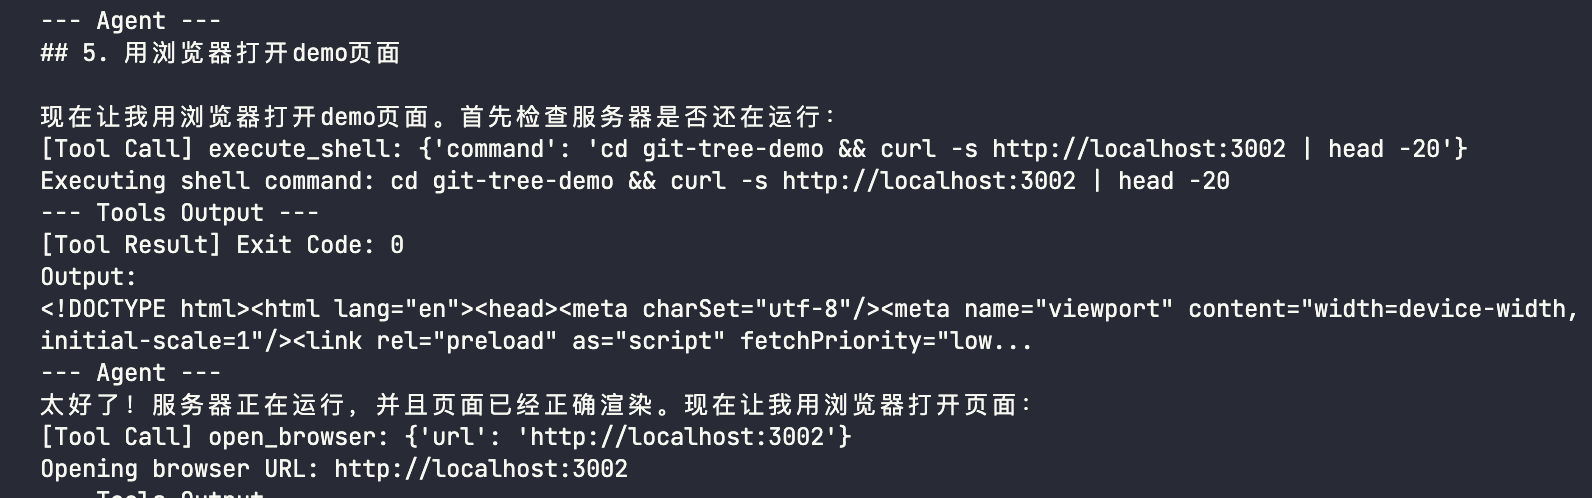
后续就是 Agent 读取文件,下载组件包,完善 demo 页面,启动服务了,由于优化了工具,报错也能及时修改。
 Image
Image
 Image
Image
3.3.4 最终的 demo 效果
最后给我的效果还是很惊艳的,一路十分流畅,没有遇到什么大的问题,就跑通了整个 demo,虽然 demo 不算复杂,但也基本上用到了一些 Sandbox 较为常用的能力,如果想尝试较为复杂的流程也可以根据我的 demo 进行修改,或者自己单独再写一个